Begin here
Your first project in seven steps
- Create a project. Choose New, then select 16:9 landscape, 9:16 vertical, or square for the final frame.
- Import media. Select Import, drag files into the media bin, or drag them directly from Finder onto a timeline layer.
- Preview a source. Click a media-bin video to open Source Preview. Use its scrubber to inspect the file, then double-click or drag it to the timeline.
- Build the sequence. Trim clip edges, split at the playhead, and drag clips together until snapping closes the gap.
- Add polish. Use the Inspector for framing, audio, color, blur, motion, captions, transitions, and other selected-clip settings.
- Save the project. Press Cmd + S. QuickCut also keeps autosave and recovery information.
- Export. Choose a preset, select the destination, and leave QuickCut open while it renders and validates the finished file.
Know the workspace
Four areas, one editing flow
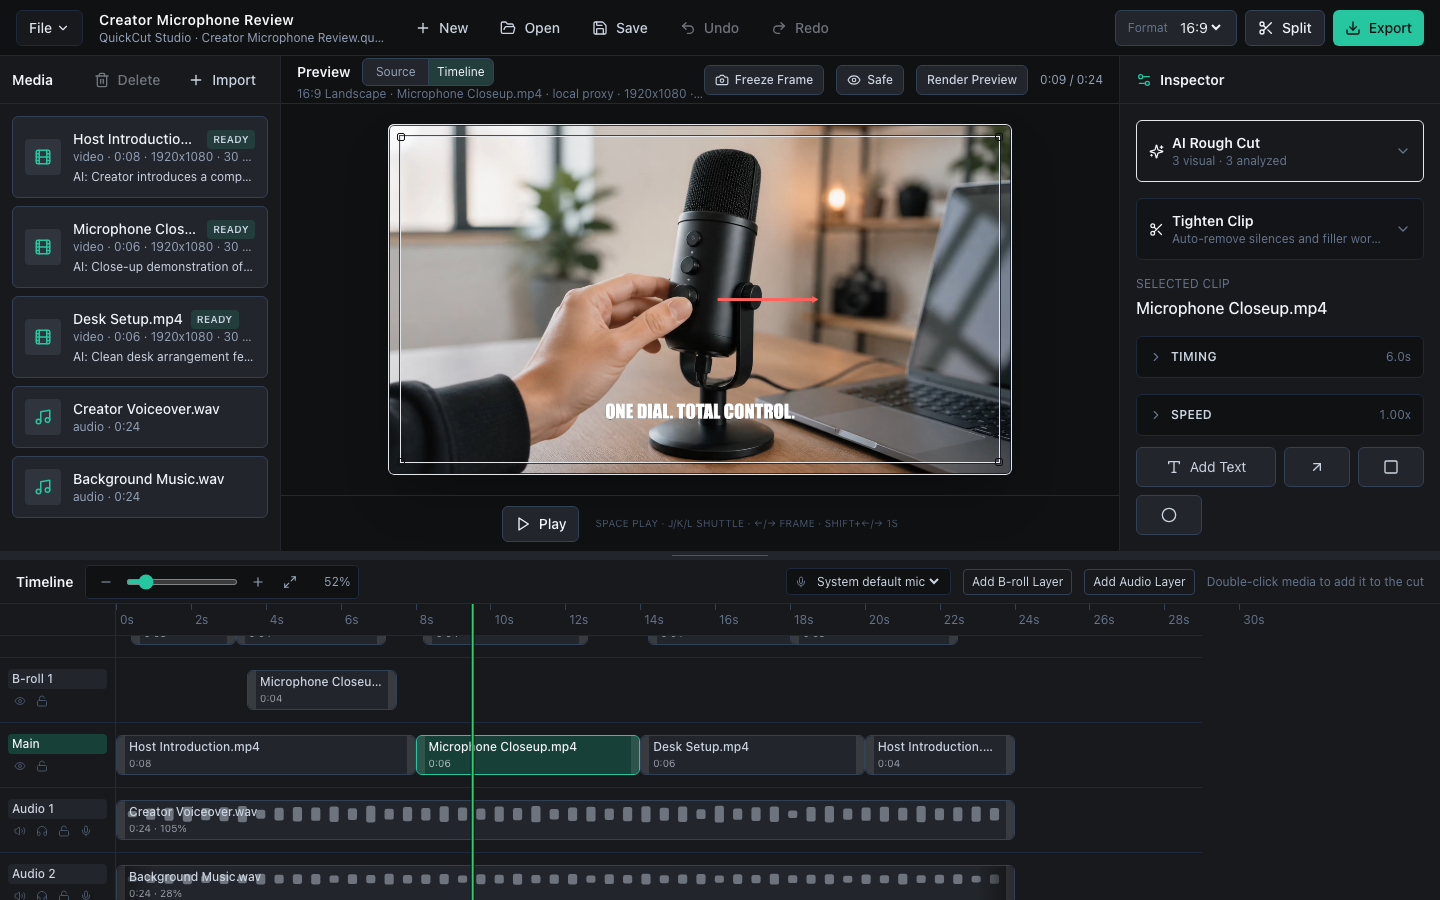
Media bin
Imported video, audio, and image files live on the left. Click a visual file to inspect it in Source Preview. Select multiple items when you need to remove a group from the project.
Preview
The center viewer switches between Source Preview and Timeline Preview. Click the timeline or a timeline clip to return to the composed edit. The frame border shows exactly what the exported canvas contains.
Inspector
The right side shows settings for the selected clip, text object, shape, or media-bin item. Open only the section you need, such as Frame, Audio, Blur, Color, Motion, or the optional AI tools.
Timeline
The lower area contains the playhead and all active layers. Drag the divider above it to give the timeline more room, or move it down when you want a larger preview.
Build the sequence
Timeline editing
Add and arrange clips
- Double-click media to append it to the main timeline.
- Drag media onto a specific Main, B-roll, or Audio layer to choose its destination.
- Drag a timeline clip vertically to move it between compatible layers.
- Use Add B-roll Layer or Add Audio Layer when another layer is needed.
- Top visual layers cover lower layers only where the top item has visible pixels. Smaller or transparent B-roll reveals the Main layer below.
Trim, split, and select
- Drag either clip edge to shorten or extend the available source range.
- Place the playhead and choose Split to cut a clip. Linked source audio is split with its video.
- Click an empty timeline area and drag a selection rectangle around clips on the layers you want.
- Hold Shift while clicking to add or remove individual clips from a multi-selection.
- Press Delete to remove selected clips.
Snap, zoom, and navigate
Snapping aligns a moved clip with nearby clip edges and prevents tiny accidental gaps. Use the timeline zoom slider or the plus and minus keys to see either precise edits or the complete sequence. Track labels remain fixed at the left as you scroll through longer projects.
Clip context menu
Right-click a timeline clip for common actions such as duplicate, split, unlink audio, reset frame, and delete. The menu repositions itself so commands remain visible near the bottom edge of the app.
Compose the frame
Video, images, and visual tools
Frame controls
Select a video or image and open Frame. Fit shows the whole source, Fill covers the canvas, and Crop lets the source exceed the frame. Adjust Scale, X, Y, and Rotation, or use the center control. Reset Frame returns the item to a predictable starting state.
Motion and image moves
Open Motion to define start and end scale, position, and rotation. This creates zooms, pans, and off-screen entrances without changing the underlying media. A scale below 100% is allowed when the source should occupy only part of the frame.
Blur sensitive information
- Select the video or image on the timeline.
- Open Blur in the Inspector.
- Choose whole-clip blur or select Add Blur Area.
- Drag and resize the blur box in the preview, then adjust Strength in the Inspector.
Blur is applied to that layer before higher B-roll is composited, so an unblurred overlay can remain crisp while exposed areas beneath it stay blurred.
Color, green screen, and transitions
- Color adjusts brightness, contrast, and saturation.
- Green Screen is available for B-roll. Select the key color, then tune tolerance, edge softness, and spill cleanup.
- Fade In, Fade Out, and Both apply clip fades. The starting duration is one second and can be customized.
- Cross Dissolve to Next creates a true blended transition between neighboring main-track clips.
Freeze a frame
Park the timeline playhead on the frame you want and choose the freeze-frame action. QuickCut creates an image file and adds it to the media bin so it can be placed and edited like any other image.
Hear the edit
Audio and narration
Source audio and unlinking
Video arrives with its source audio linked. Right-click the video and choose Unlink Audio when you want separate control. The detached audio remains audible by default and can be moved, trimmed, muted, or deleted independently.
Levels and ducking
Select an audio clip and open Audio. The level control can reduce the clip or boost quiet material up to 300%. Use Duck under other audio on music that should become quieter while speech on another track is active.
Record narration
- Add or select the audio layer where the recording should begin.
- Place the playhead at the desired start time and select the record control.
- Allow microphone access when macOS asks.
- Stop recording when finished. QuickCut saves the recording and places it in the project for editing.
QuickCut creates additional audio layers only when needed, which keeps smaller projects uncluttered while still supporting original sound, music, and voiceover together.
Titles and callouts
Text, captions, shapes, and animation
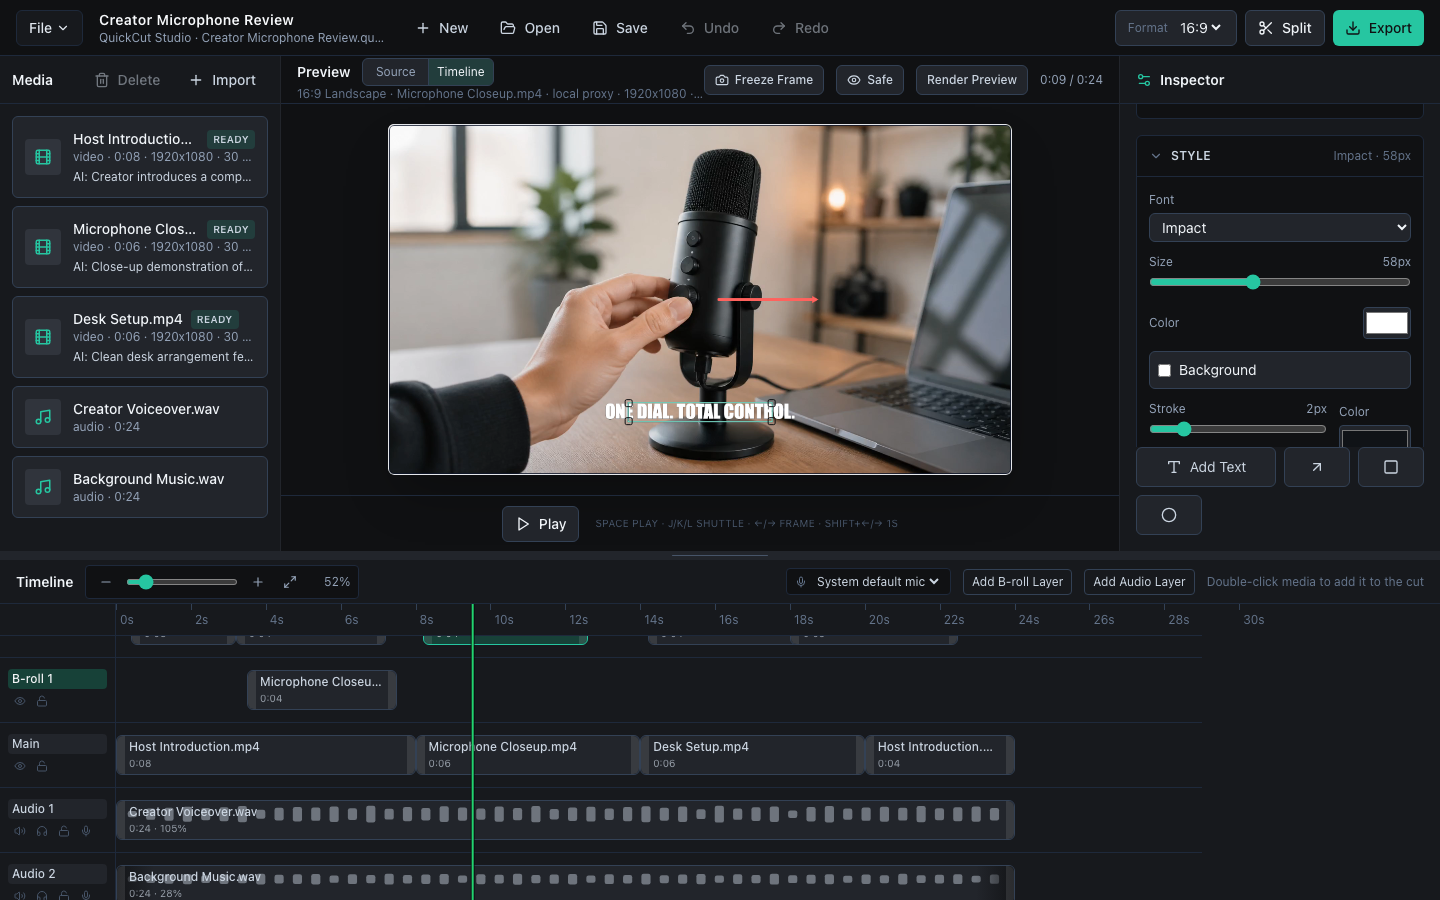
Add and style text
Select Add Text, then choose a title, lower third, or caption style. Edit the characters, font, size, color, background, stroke, position, and rotation in the Inspector. Text stays on one line unless you insert a line break yourself.
Edit captions as a group
Drag a selection rectangle around multiple text clips on the text layer, or Shift-click them. A shared font, size, color, background, or stroke change is applied to all selected text items.
Animation and shapes
Use None, Social Pop, Fade Up, or Soft Zoom for simple text entrances. Add arrows, rectangles, and ellipses as independent timeline objects, then position, resize, rotate, color, and time them like other overlays.
Optional setup
Choose the right AI provider
QuickCut separates its strongest speech workflow from its visual experiments. AssemblyAI handles spoken-word transcription, editable captions, and clip tightening. Gemini and Ollama are most useful for media descriptions and tags, with experimental rough-cut planning available as an optional starting point.
| Provider | What QuickCut uses it for | Runs where | What you need |
|---|---|---|---|
| Gemini | Media descriptions, tags, visual sampling, and experimental rough-cut planning | Google cloud | Your Gemini API key and internet access |
| Ollama | Local media descriptions and tags, plus experimental rough-cut planning; visual tagging requires a vision model | Your Mac by default | Ollama running and a downloaded model |
| AssemblyAI | Transcription, editable narration captions, silence removal, filler-word removal, and optional narration context | AssemblyAI cloud | Your AssemblyAI API key and internet access |
Set up Gemini Cloud
Cloud media analysis- Open Google AI Studio, sign in, and create or view a Gemini API key for your Google Cloud project.
- In QuickCut, open AI Tools in the Inspector.
- Set AI Edit Provider to Gemini Cloud.
- Paste the key into Gemini API Key. QuickCut saves it automatically in macOS Keychain.
- Keep the model shown by QuickCut unless you know that another Gemini model supports the same media and structured-output workflow.
Gemini usage is governed by your Google account, quota, billing tier, terms, and safety filters. Temporary capacity errors can usually be retried later. A paid tier can provide higher limits, but it does not guarantee that every item will pass a provider safety check.
Set up Ollama Local
Local media analysisOllama currently requires macOS 14 Sonoma or later. Local performance depends on the Mac, available memory, model size, and source media.
- Download Ollama for macOS, move it to Applications, and launch it.
- Open Terminal and download a vision-capable model. For example, run
ollama pull qwen2.5vl:7borollama pull gemma3:4b. - In QuickCut, set AI Edit Provider to Ollama Local.
- Leave the server URL at
http://localhost:11434for a model running on the same Mac. - Select the refresh button, then choose an installed model from the Model menu.
A text-only model can plan from filenames, metadata, manually edited descriptions, and cached analysis, but media-bin tagging requires a model that accepts images. QuickCut analyzes videos by sending sampled frames rather than the complete moving video to the local vision model.
Set up AssemblyAI
Recommended for captions- Create an AssemblyAI account and open the API Keys area of its dashboard.
- Create a key for QuickCut and copy it.
- Open AI Tools in QuickCut and paste it into AssemblyAI API Key.
- Choose an imported narration file or Audio 1 edited timeline under Narration / Source Audio.
- Select Captions for captions only, or use Rough Cut when the edit provider should also plan around the transcript.
The key saves automatically in macOS Keychain. AssemblyAI uploads and processes the selected audio under your AssemblyAI account, quota, billing, terms, and retention settings.
Put AI to work
Captions, media analysis, and experimental rough cuts
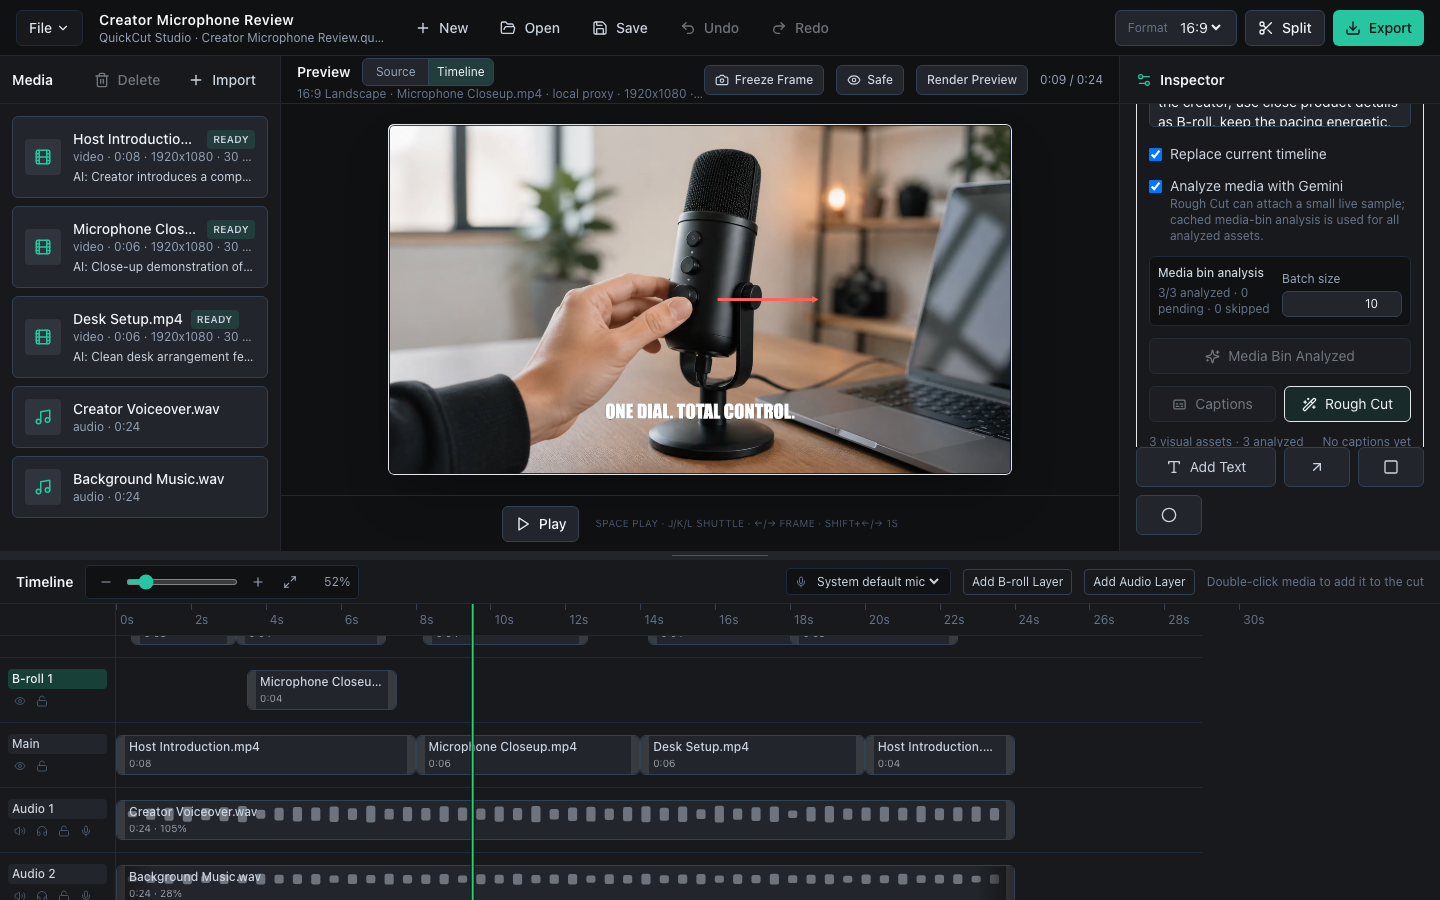
Create captions from narration
- Configure an AssemblyAI API key and import the narration or spoken video you want to transcribe.
- Select that file, or choose Audio 1 edited timeline, under Narration / Source Audio.
- Select Captions. QuickCut transcribes the speech and places timed caption clips on the text layer.
- Review the wording, then select one or several captions to apply a consistent font, size, color, background, and stroke.
This is the most polished AI-assisted workflow in QuickCut. The generated captions remain ordinary, editable timeline objects, so transcription corrections and design changes stay under your control.
Analyze the media bin
- Choose Gemini Cloud or Ollama Local and complete its setup above.
- Write the intended video in Edit Direction. QuickCut passes that context into analysis so descriptions can emphasize relevant people, objects, actions, and shots.
- Choose a batch size and select Analyze Next. Completed results are saved to each media item as the batch progresses.
- Run the next batch until pending reaches zero. Use Retry skipped assets after temporary provider errors.
- Select a media item to read and edit its summary, tags, style, and notable moments. Your edits are saved with the project and can inform future searches or experimental rough cuts.
Try an experimental AI rough cut
- Import the visual assets that the edit may use.
- Write a concrete Edit Direction: audience, pace, aspect ratio, target length, opening shot, visual priorities, and anything to avoid.
- Choose No narration, use prompt only for a visual prompt-driven cut, or select narration and configure AssemblyAI when the spoken content should guide timing.
- Leave Analyze media with enabled when the provider should inspect a small live sample in addition to cached analysis. Turn it off for a faster metadata-only plan.
- Choose whether the result should replace the current timeline, then select Rough Cut.
- Watch the status and run log. If QuickCut recommends missing shots, add them first or continue with the available media.
- Review every result on the timeline. Reorder clips, adjust timing, replace weak selections, and make the creative decisions that turn the suggestion into your edit.
Tighten a spoken clip
Select a video or audio clip, open Tighten Clip, and analyze it with AssemblyAI. Set the minimum silence, retained padding, and filler-word option. Review the number of proposed cuts and time saved before applying; press Cmd + Z if the result is too aggressive.
Finish the project
Export a final video
- Save the project and confirm that all source drives and folders are connected.
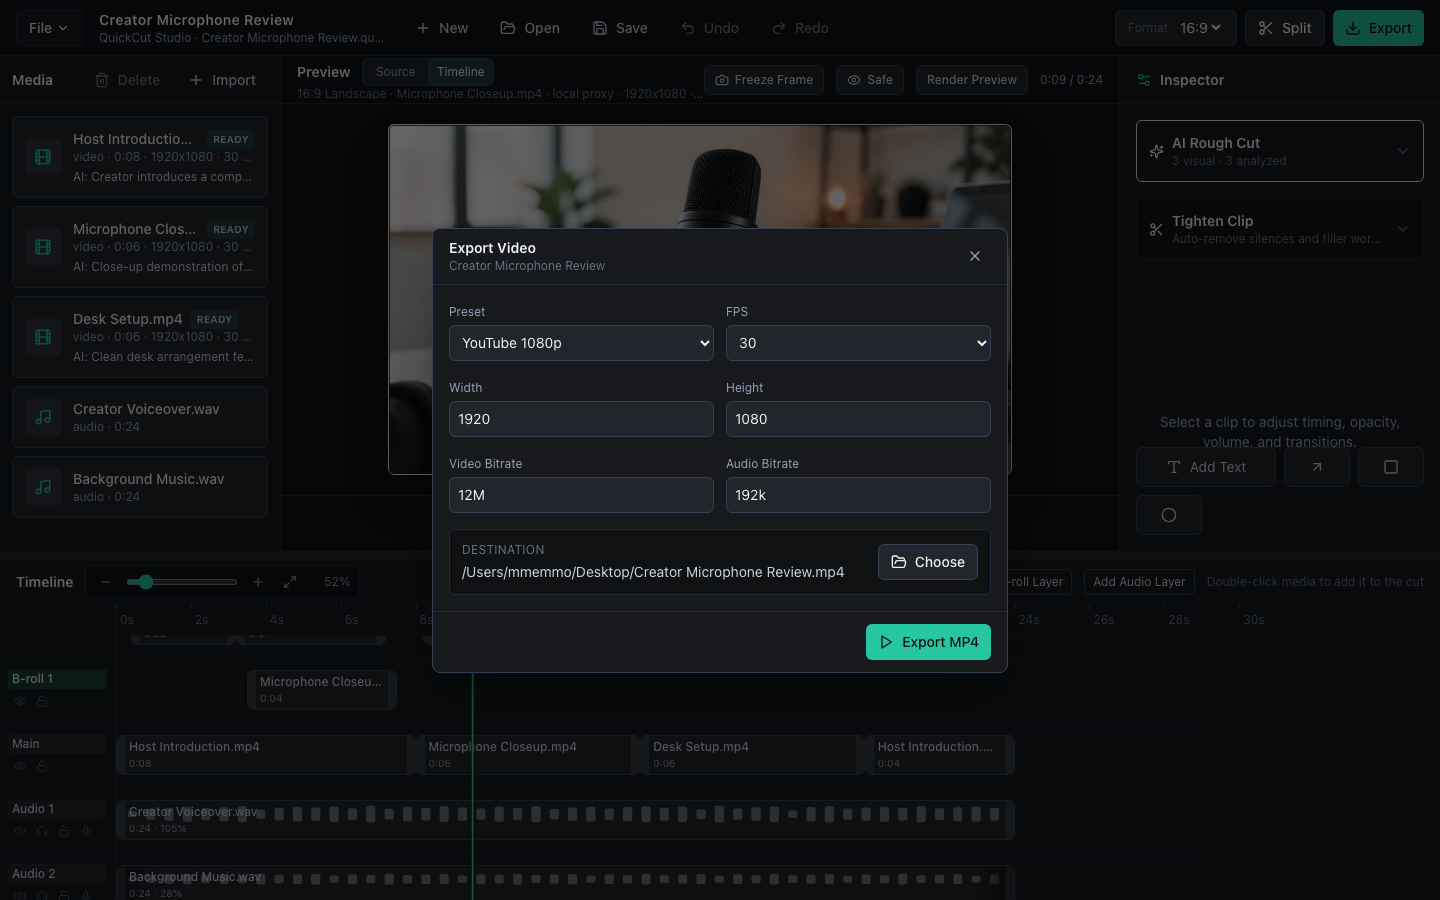
- Open Export and choose YouTube 1080p Landscape, Shorts/TikTok Vertical, or Instagram Square.
- Review the displayed frame size, frame rate, video bitrate, and audio bitrate.
- Select an output file and start the export.
- Keep QuickCut open until rendering and validation are complete. The final message reports success or explains what needs attention.
QuickCut release builds include the native media tools used for export, so colleagues should not need Homebrew or a separate FFmpeg installation.
Move faster
Useful keyboard controls
Keyboard transport and timeline zoom are ignored while a text or number field is actively being edited. Click the preview or timeline to return focus to editing controls.
When something needs attention
Quick troubleshooting
A file is still processing after import
Wait for its media-bin status to change to Ready. QuickCut is probing the source and preparing lightweight preview media. Large, high-resolution, or unusual source files can take longer.
Preview playback is choppy
Wait for preview files to finish, then use Render Preview for a demanding timeline. Keep the source drive connected and close other applications that are consuming substantial memory, storage bandwidth, or GPU resources.
An AI button appears to do nothing
Open AI Tools and read its status panel and run log. Confirm the provider, key or local server, selected model, pending media count, narration choice, internet connection, and provider quota.
Gemini skips or blocks one item
A provider safety filter, unsupported media, malformed response, quota limit, or temporary service condition may be responsible. The completed batch progress remains saved. Retry the skipped item, edit its description manually, or try Ollama for local analysis.
Ollama cannot analyze media
Make sure the Ollama app is running, the URL is correct, and the selected model accepts image input. Refresh the model list in QuickCut. A text-only model can plan from existing descriptions but cannot create visual tags.
An export differs from the preview or fails validation
Save the project, verify every source file remains readable, choose a local destination with enough free space, and retry. Keep the complete QuickCut message and filter-graph path if support is needed.